


Nitecore P25 Smilodon Flashlight Review by Booligan
Discuss this review HERE
.PNG)
Table of Contents:
Introduction
Ordering
Basic Information
First impressions/Packaging
Included Accessories
Flashlight Details
Performance
Pros/Cons
Overall
Introduction
Anyone who knows me knows that my favorite accessory for airsoft use is a bright, tactical flashlight. Functionally, a flashlight is one of the most important accessories that you can get, as it gives you much greater usefulness in low light situations. I've tested flashlights from a wide variety of manufacturers, and with a wide range of prices from $5 units, up to ones costing hundreds of dollars, and today, I think we might be looking at the brightest one I've ever tested. Today, we're going to be testing out the P25 Smilodon, which is one of the latest tactical offerings from Nitecore. This light has some really impressive features, including the brightest beam I've ever tested, so keep reading for more information on this light system!
Ordering:
I was sent this light to review by Airsoft Atlanta, who has it available HERE, priced at $96.99. Along with the light itself, we're going to be testing the recommended rechargeable 18650 battery, which is available HERE, which is priced at $9.99. Airsoft Atlanta recently started carrying the majority of Nitecore's product line-up, ranging from $30 budget models up to the $400 mini monster, 4 head, 3500 lumen TM26. If you're looking for a light from mild to wild, THIS is a great place to start!
Basic Information:
The PM25 Smilodon light is currently the only light in Nitecore's “Precision” tactical series of lights. It is designed specifically for tactical use, and has a few features that make it really tailor made for airsoft/military/police use. Featuring an aircraft grade aluminum body, hard mineral lens, and anodized coating available in two colors, black and gray, this thing is built damn tough and is able to take any abuse you can throw at it. It's listed as being impact resistant for drops up to 1.5 meters, and it is waterproof and submersible down to 2 meters. It's not a dive light or anything like that, but it'll handle most environments airsofters find themselves in. It is rated at a blistering 860 lumens, which is incredibly bright for a relatively compact flashlight. I'll go over the specific features and details of this light a little later on in the review.
First impressions/Packaging:
Nitecore put together a nice package to hold and ship the P25, consisting of a cardboard box with a plastic molded inner liner to keep everything safe and secure. All of the accessories, which I'll go over in the next section, are held underneath the plastic liner. When I pulled the light out of the box, I was impressed, both with how sturdy and well made it felt in my hand, but also with how light it was. With all of the aluminum and stainless steel spread around this thing, I was expecting it to be heavier, and I'm pleased that it's quite lightweight.
From here on, click all pictures to enlarge

Box art
Included Accessories:
Along with the light itself, Nitecore includes a plastic removable tactical ring, titanium coated two way clip, wrist lanyard, nylon holster, USB charging cord (for use with the 18650 battery ONLY), as well as spare O-rings, tailcap button, and USB charging port cover. It's nice that the company includes these spare parts to help lengthen the life of the light.

Everything included

18650 battery for testing
Flashlight Details:
As mentioned before, this flashlight is a relatively compact design, especially when you consider its light output. It measures about 6.3” (160mm) long, with a 1” (25.4mm) wide main body and a 1.57” (40mm) diameter head. It is relatively lightweight as well, coming in at under half a pound with the battery loaded in. The weight balance is quite nice, mostly in the head, but with enough weight spread around throughout the whole thing to keep it from feeling too front heavy. It can use either dual CR123 batteries or a single 18650 unit, which is recommended, as you can use the USB recharging port with the 18650.

External overview, left side

Right side
I'll start with the tail cap, which is a unique design with two button guards that allow you to easily access it while wearing gloves, while still protecting it from accidental activation. The guards feature a small slot for mounting up a wrist strap, which is included with the kit. The button can be pushed in half-way for momentary activation, or pressed all the way in for click on/off activation. The button guards allow the light to stand on its end, albeit a bit insecurely, due to the fact that there's only two of them. The tail cap can be slightly unscrewed to lock out the light, due to the anodized threads, which I'll show a little later on.

Tail cap

Wrist strap attached
Moving forward, you'll hit the main body of the light, which has a nicely textured finish to help you keep a good grip on it. This main body tube is 1” in diameter, so you can easily use a wide variety of light mounting rings to weapon mount it. The body has a few small grooves in it to use with the plastic tactical ring, as well as with the titanium coated two way clip.

Main body tube

Tactical ring installed

Pocket clip installed

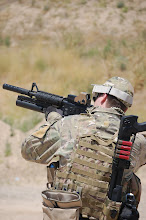
1” scope ring installed, mounted on an AEG
Moving forward still from the main body, you'll hit what I like to call the control unit, which houses the side button assembly, USB charging port, and the 20mm rails, which double as heat sinks. The side button is a two stage switch, described like a camera shutter button. It has different functions, depending on if you push it halfway or all the way, and I'll explain the different functions in the Performance section. It even has a blue light in the base of the button that can tell you different things about the light. On the other side, you'll find the USB charging port, which is designated for use only with the available 18650 rechargeable batteries. Lastly, the dual 20mm rails allow you to mount accessories to the light, be it other lights, lasers, even sights if you felt so inclined. It can also be used to mount the light to a barrel or magazine tube of a gun if you use a properly sized scope ring. They double as a heat sink to dissipate the heat that this light puts of while running.

Multi function button

USB charging port

20mm accessory rail

Light mounted on a light!
At the very front, you'll find the head, which is made of anodized aluminum with a stainless steel bezel. The lens is made of mineral glass with an anti-reflective coating applied to both sides to allow for the best light transmission. The head design has grooves around it to act as an anti-rolling feature.

Head/lens assembly
Disassembling the light is a piece of cake and allows you to see some of the design features. Splitting it into the three main components requires you to simply unscrew the different portions. You'll note that the body tube is directional, as the front end has squared off threads that are not anodized, and the rear has triangular cut threads that are anodized, allowing you to lock out the light by unscrewing the tail cap slightly.

The light's main components, including the 18650 battery

Beautiful machine work on the front threads

Anodized threads on the tail end
Inside the front assembly, you'll find the positive battery terminal which is supported by a spring for shock resistance. The positive terminal is sunk in a bit, acting as a physical anti-reverse polarity feature, as the flat base of a battery won't hit the terminal. Because of this, you need to use CR123 or 18650 batteries that have a button protrusion on the positive terminal. Inside the tail cap, you'll find a sturdy negative spring terminal, and the button assembly can be further dismantled to replace the rubber button cover.

Positive terminal

Negative terminal
Performance:
For all my testing, I am using a Nitecore 18650 battery, which is rated at 3.7v/2300 mAh. There are batteries available with higher mAh rating, but this is the base battery available. You can also use two CR123A batteries in this light instead, but you cannot use the USB charging feature with them, and your light output will be less. The light has some impressive stats, which I'll post below.

Light stats
The beam shape consists of a tight hot spot, maybe 12” wide at 20', with decent peripheral illumination for total area lighting. It's certainly a spot light, not a flood light, but for tactical use, it's a great beam design. It's a cool white spot with some very slight bluish tint if shining on a white surface.

Beam color

Spread from the head
The light has a variety of operating modes, all accessible using the dual stage side switch. To use the light, first, you must turn on the tail cap switch, which will turn the light on to your last selected power level. To cycle through the give different power levels, half push the side button until you hit your desired power level from low through turbo mode, which is the brightest. Note, the light will automatically switch from turbo to high mode after 20 minutes to prevent overheating. Below, you'll see the different power output levels, all shot at the same camera settings (4.2 F stop/ISO 200/0.5 second exposure).

Level 1 – 2 lumens

Level 2 – 50 lumens

Level 3 – 180 lumens

Level 4 – 550 lumens

Level 5 – 860 lumens (turbo mode)

This shot is turbo mode, shot with shorter exposure time to highlight the beam pattern

Outside shot at 30', showing spread and beam pattern
The light does have a few other operating modes, aside from just on and off, again, all accessible from the side switch with the tail cap turned on. The first is the strobe mode, which is activated by pushing the side button down completely for over one second. Once you do that, the light starts flashing rapidly in strobe mode. Once in strobe mode, you can half push the button to switch between strobe, SOS, and beacon mode. In SOS, it will blink in a Morse code SOS pattern, and in beacon mode, it'll flash very quickly every few seconds. To return to the fixed on/off mode, push the button completely, which will set it in standby mode. In standby mode, the side button will blink every few seconds to show that it is in standby mode and to help locate it if lost. There is a small drain when in standby mode, but it will keep the memory of your last selected brightness level. When in standby mode, you can push the button in halfway, and the button light will blink to show you the battery voltage, within 0.1v. An example of this would be 4 blinks, a pause, and 2 blinks, showing a voltage of 4.2v. The video in this review will show the different light functions better than I can explain them.
Battery life with the 18650 rechargeable has been great in my testing. In turbo mode, it's rated at 1 hour 45 minutes, and it stretches out as long as 325 hours in the lowest setting. The USB recharging feature (for 18650 batteries ONLY) is genius, and works with pretty much any USB port, including computers, wall outlets, and car adapters. To charge, you simply connect the included mini-USB cord and push the tail cap switch to the on position. The side indicator will blink every half second to indicate that it's properly charging. If it's blinking quickly, something is not connected properly, or you don't have the tail cap switch turned on. It'll charge an 18650 battery from dead to full in 6 hours, and with the Nitecore battery reviewed today, it'll cut off automatically if it's too low and once it's fully charged.
Overall, performance wise, this thing is the brightest light I've ever tested, hands down. It's ability to throw out such a bright, concentrated beam of white light is really impressive, considering its small size and weight. The battery life is great with the 18650 unit, and the ability to recharge it on the fly with the included USB cord is a brilliant idea.
Pros:
Great materials used in the construction (aluminum and stainless steel throughout)
Incredibly bright, it's really hard to explain how bright this thing is
Relatively compact size and light weight
Multiple functions including different brightness selections, strobe, SOS, and beacon mode
Includes rails to mount accessories (lights mounted on lights!)
Long battery life with the optional 18650 battery
USB charging is incredibly convenient
Includes a nice set of accessories (clip, wrist strap, tactical ring, etc)
Pressure switch is available, but not included
Cons:
It's a little pricey, but compared to similar lights, it's not TOO bad
Doesn't include rings for weapons mounting, but uses standard 1” rings
USB charging is only available for the 18650, not with CR123A batteries (even if they're rechargeable)
Rubber coating on the side button has peeled off a bit
Overall:
I've tried out quite a few lights in my airsoft career, but the Nitecore P25 is the brightest, most feature packed thing that I've ever tested out. With the 860 lumen output, strobe features, and USB charging, it's really a great mixture of power, performance, and convenience. You can use it as a handheld unit or as a weapon mounted setup, and either way, it does a great job. The whole pack with light and battery will cost you a little over $100, which isn't terribly cheap, but when you compare it with other light setups with similar power and features, it's not bad at all. Nitecore has other lights available with varying power outputs and features, so there are other lights with their same quality but at differing prices, so if you're in the market, I strongly suggest checking out their lineup to see if there's something that works for you!
Many thanks again to Airsoft Atlanta, and of course, Airsoft Retreat!